

How To Add An Image Overlay In Hubspot Template Page
Difficulty Level: Intermediate. This mail service assumes a solid agreement of HubSpot tools and some technical cognition. Instructions are detailed and tin can be applied as they appear on the post.
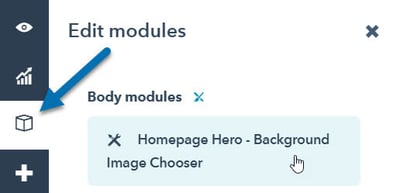
It's pretty common these days to use background images backside your content. When building HubSpot templates, I similar to apply a "Background Prototype Choose" module that lets yous update the background image at the folio level. This posts walks you lot through how you can build your ain. One time you create a new module (yous can telephone call it "Background Prototype Chooser"), yous tin add the following fields on the correct-paw side. For each ane you'll select the correct field blazon (in parenthesis), requite them a name and ensure that their variable name matches what appears in lawmaking styling beneath. If you need to add additional options to the fields, details volition exist given. Yous'll notice there are a lot of options which volition give you plenty of flexibility when using the module on your page! In the HTML + HubL section of the module, paste in the post-obit lawmaking snippet: And that's information technology! Your module should now look something like this: Click on "Publish" in the upper right-hand corner and you should be able to start using information technology. Yous can drag the module anywhere into your template. In society for information technology to apply the background to a group or module, all you need to do is give that group or module a CSS ID and add in that aforementioned ID to the "Container ID" field of the module. For example, I tin create a group for my homepage hero and give it the CSS ID "home-hero": Drag the module into that group and set the Container ID to "home-hero": For multiple groundwork images, add in multiple modules and link each one to its group or module by using the same CSS ID on both. If yous become to your page and click into the "Modules" section on the left-hand sidebar y'all should see your module: Clicking into it will permit yous update your groundwork image with plenty of options (positioning, colour overlay, parallax...) and clicking on "Utilize" will update those changes on your folio.Create your module's fields
container_id: this will be the ID of the module or group you'd like to employ the groundwork module to. Something similar "my-groundwork"background_colour: the default groundwork colour that appears before the image loads or if it fails to load. Choose a default colour.background_image: the image you'll choose for the groundwork. Choose a default epitome.background_x: sets the horizontal starting position of the groundwork image. This helps set the focal point of your image when the screen is resized. Under this field you'll add choices for Left (left), Centre (eye) and Correct (correct). Set the default to center.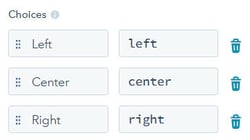
background_y: sets the vertical starting position of the background image. This helps set the focal indicate of your epitome when the screen is resized. Under this field y'all'll add together choices for Top (top), Center (center) and Lesser (lesser). Set the default to center.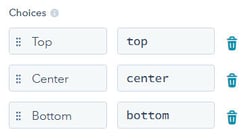
background_size: you'll add in two options here - Encompass (comprehend) and Comprise (contain). Cover resizes the groundwork prototype to cover the entire container, even if information technology has to stretch the epitome or cutting a little bit off one of the edges. Incorporate resizes the background paradigm to make sure the image is fully visible. Set the default to cover.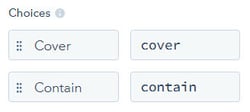
colour_overlay: if enabled, you can add a colour overlay to your background image.overlay_colour: the colour that will appear over your epitome, if the higher up selection is enabled. Set your default colour to have a transparency or you won't be able to meet your image! Ringlet downward to "Display conditions" and set it to testify if the to a higher place field (colour_overlay) is enabled, similar this: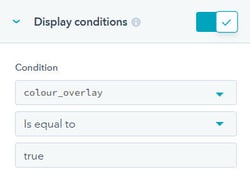
add_parallax: if enabled, y'all'll accept a parallax issue on your module.Add in the code
{% require_css %}
<style>
#{{ module.container_id }} { background-color: rgba({{ module.background_colour.color|convert_rgb }}, {{ module.background_colour.opacity/100 }}); {% if module.background_image.src %}background: {% if module.colour_overlay %}linear-slope(rgba({{ module.overlay_colour.color|convert_rgb }}, {{ module.overlay_colour.opacity/100 }}), rgba({{ module.overlay_colour.color|convert_rgb }}, {{ module.overlay_colour.opacity/100 }})), {% endif %}url({{ resize_image_url( module.background_image.src,1920,0 ) }});{% endif %} background-repeat: no-repeat; background-size: {{ module.background_size }}; background-position: {{ module.background_x }} {{ module.background_y }}; position: relative; {% if module.add_parallax %}background-zipper: fixed;{% endif %} }
</mode>
{% end_require_css %}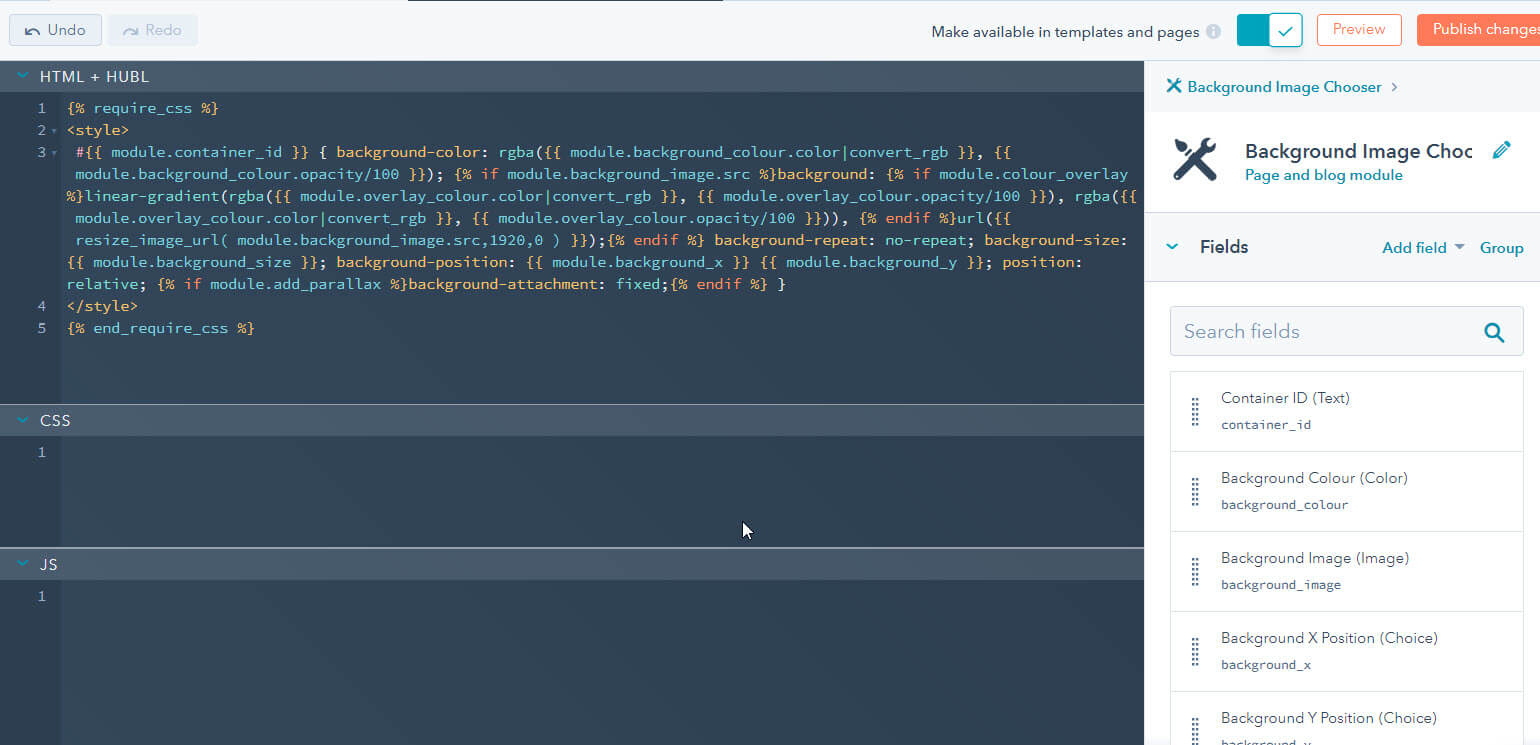
Using the "Background Image Chooser" module
Add the module to a template


Updating the module on your page

How To Add An Image Overlay In Hubspot Template Page,
Source: https://www.stephanieogaygarcia.com/hubspot-website-development/add-an-editable-background-image-to-your-hubspot-template-or-page
Posted by: batesountracentle.blogspot.com
0 Response to "How To Add An Image Overlay In Hubspot Template Page"
Post a Comment